How to Create a Power BI Date Range Slicer?
Slicer visuals include powerful filtering options for date data types, such as a graphical date picker, criteria before and after, and relative dates such as the last two weeks.
By default, Power BI has two options, one is a list and the other is a dropdown. Additional options may work, depending on the type of data used by the slicer.
Instead of using a list or dropdown slicer, we’ll use a date range slicer with a horizontal scroll bar here.
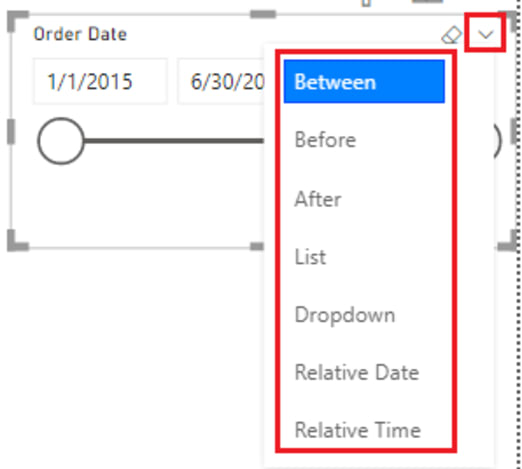
Step 1: On the Power BI report page, create a slicer with a date data field. Once the date range slicer is added to the canvas, you can click the down arrow (shown in the image below) to see all the available options.
Step 2: After adding the date range slicer to the page, click the down arrow to see all available options.
Understand how to use each of the available options one by one.
- Between -The user is given a date range between the start and end dates in the horizontal scroll bar.
- Before -You have the option to use the horizontal scroll bar to select a date before a specific date or the end date itself.
- After – Use the horizontal scroll bar to give the user the option to select a date after a specific start date or the start date itself.
- List – You must use the checkbox to select a date from a list of predefined dates.
- Dropdown – The user must select a date from the date dropdown list with checkboxes.
- Relative – Here you can select the Next, Last, or This date in any number of days, months, or years.
Step 3: By default, the slicer displays the date with the Between option, so you can change it as per your requirement. Further investigation has shown that this is also the easiest option, as the data is automatically populated and does not require manual configuration. A horizontal scroll bar displays the start and end dates, allowing you to select a range between the two dates.
Points to Consider When Using Power BI Date Slicer
Some of the limitations and considerations of using Power BI Date Slicer and Filter are listed below:
- The data type of the field that you will use for the Slicer should be a date, not the default of text to ensure that the relative options will show up in the slicer.
- The data models in the Power BI don’t have information related to time zones. So, data can be stored in Power BI but without any indication of the time zone.
- The Power BI Date Slicer works on the time in UTC. So if you are sharing your reports with others in different time zone then they will view the data in your time zone.
- The Query Editor allows users to convert the data stored in the local time zone to the UTC


No comments:
Post a Comment