
By: Sergey Gigoyan | Updated: 2020-07-09 | Comments (32) | Related: More > Integration Services Development
A sample timeline of Business Central Implementation
Microsoft Dynamics 365 Business Central Implementation Plan
BUSINESS CENTRAL WAREHOUSE MANAGEMENT SYSTEM (WMS)
BUSINESS CENTRAL WAREHOUSE MANAGEMENT SYSTEM (WMS)
BUSINESS CENTRAL WAREHOUSE MANAGEMENT SYSTEM (WMS)
Functions for warehouse management in Dynamics 365 Business Central
Functions for warehouse management in Dynamics 365 Business Central
Administration
- Bin Setup
Storage bins reflect the basic warehouse structure. In Dynamics 365 Business Central, when you create storage bins, you can define the contents you place in each bin very specifically. Alternatively, the storage location can function as a storage bin without specified contents.
On this basis, proposals are made for the placement of items.
Microsoft Dynamics 365 Business Central: Implementation Plan
Microsoft Dynamics 365 Business Central: Implementation Plan
The objective of this post is to provide a high level overview of different stages in the implementation of Microsoft Dynamics 365 Business Central (D365BC) to help companies prepare for it, navigate through it and succeed.
Microsoft Warehouse Management Software
Microsoft Warehouse Management Software
What manufacturing and distribution features does Microsoft offer for warehouse management?
Free! Business Central online Tutorial
Business Central online Tutorial
https://usedynamics.com/business-central/
How to set up quick find columns in Dynamics 365/CE Online & On-premise environments
How to set up quick find columns in Dynamics 365/CE Online & On-premise environments
Dynamics-365-Workflow-Tools
Dynamics-365-Workflow-Tools
This Solution includes one Assembly that contains Tools based on Workflow Activities. You must import this solution, to use it. It only contains the Workflow Assembly and the activities to be used in Workflows, so the import of this solution it will not affect any form, entity, view or navigation item.
OOB CONTACT Field Retrieve Info Details
Xrm.WebApi.retrieveRecord("contact", primaryContactId).then(
function success(result)
OOB ACCOUNT Field Retrieve Info Details
Xrm.WebApi.retrieveRecord("account", customer[0].id.replace("{","").replace("}","")).then
.........
How to Set a Lookup Field Value in Dynamics 365 using JavaScript
How to Set a Lookup Field Value in Dynamics 365 using JavaScript
Requirement:
- If a CUSTOMER type of field's value is an account, needs to populate another field ("dfa_primarycontactid") with this account's primary contact info.
- If a CUSTOMER type of field's value is a contact, needs to clear the value of another field ("dfa_primarycontactid")
How to determine if a CUSTOMER field value is an Account or a Contact through JavaScript
How to determine if a CUSTOMER field value is an Account or a Contact through JavaScript

Use Word templates to create standardized documents
Use Word templates to create standardized documents
After you create and import Office Word templates into customer engagement apps (Dynamics 365 Sales, Dynamics 365 Customer Service, Dynamics 365 Field Service, Dynamics 365 Marketing, and Dynamics 365 Project Service Automation), with one click users can generate standardized documents automatically populated with data. This feature has some special considerations you should know about to successfully create Word templates.
Installing MS SQL Server 2019 Database and Integration Service
Installing MS SQL Server 2019 Database and Integration Service
Install SQL Server Integration Services in Visual Studio 2019
Install SQL Server Integration Services in Visual Studio 2019
How to download the invoices of Microsoft certification exams you passed
How to download the invoices of Microsoft certification exams you passed
Power BI Date Range Slicer
How to Create a Power BI Date Range Slicer?
Slicer visuals include powerful filtering options for date data types, such as a graphical date picker, criteria before and after, and relative dates such as the last two weeks.
Power BI Date Filter
Creating Power BI Date Filter
In this section, you will go through the steps to create a relative data range filter to add to your report pages or your entire report. The following steps to add Power BI Date Filter are listed below.
Step 1: Create a Date Range Filter
- Open your report in Power BI and from the “Fields” pane, select the “Date” field.
- Now, drag it to the “Filter on this page” field or “Filters on all pages” from the “Filters” option.
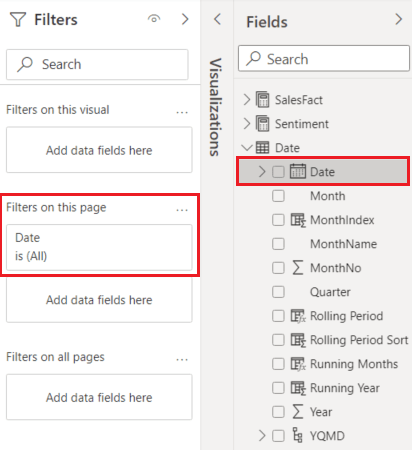
- You can also change the relative data range options, similarly, you can customize in Power BI Date Slicer.
Step 2: Configuring Date Range Filter
- For this, select the “Relative date” option from the “Filter-Type” drop-down menu.

- After selecting the “Relative Date” option. It will provide you with the 3 options under the “Show items when the value” section for configuring Power BI Date Filter.

- These are similar options to what you configured while creating Power BI Data Slicer.
- Now, here in the middle field of Power BI Date Filter, you can choose a number to define the relative data range.
- Next, click on the “Apply filter” option
Power BI Date Slicer
What is Power BI Date Slicer?

Power BI Date Slicer and Filter allow users to apply a time-based filter to any columns in your data. There are many Power BI Date Slicers, and each one has a different purpose. It helps users filter flexibly select between date ranges to show only data of a particular range. After refreshing the data, the relative period will automatically get applied for the relative date constraint.
When to Use Power BI Date Slicer?
Power BI Date Slicers are easy to use and provide flexibility to users in filtering data based on dates. Users should use Slicer for the following reasons listed below:
- So that users can view the currently filtered state without opening a drop-down list.
- It allows users to create focused reports by applying Power BI Date Slicers and Filters next to the important visuals.
- Users can filter the unneeded and hidden data tables.
- It helps display the commonly used filters on the report canvas for easier access.
Creating Power BI Date Slicer
Now that you have understood about Power BI Date Slicer. In this section, you will learn how to create and use Power BI Date Slicer and Filters. You can use Power BI Date Slicer just like any other Power BI Slicer. The following steps to create Power BI Date Slicer are listed below.
Step 1: Create a Slicer
- Open your Power BI and load the dataset.
- Now from the Vusializations tool section, select the “Slicer” option to create a report with Power BI Data Slicer.
- Then from the “Field” value, choose the column to which you want to add Power BI Date Slicer.
- For this tutorial, “Purchasing Date” is used for Power BI Date Slicer.

- Now, click on the Power BI Date Slicer from your canvas and then click on the upper-right of the Slicer visual.
- If the column has data then it will show the “Relative Date” in the drop-down menu.

Step 2: Setting Relative Date
- Here, select the “Relative Date” option to add Power BI Date Slicer to the column.
- Then, select the “Settings” option.
- In the first field of the Power BI Data Slicer settings, you can choose the following option listed below.
- Last
- Next
- This

- In the next field of Power BI Date Slicer, you can choose a number to define the relative data range.

- In the third set, you can select the date measurement. It has the following option listed below.
- Days
- Weeks
- Weeks (Calendar)
- Months
- Months (Calendar)
- Years
- Years (Calendar)

- For example, if you select the “Months” option from the last field of Power BI Date Slicer settings and 2 in the middle field.
- So, if today is 14 March, then the visual data constrained by the Slicer will show you the data of the previous two months.
- The data will start from 15 January to 14 March. But if you select the “Months (Calender)” option on the last field of Power BI Date Slicer, then it will show data from 1 May to June 30, without taking the date into consideration.
How to change the labels of composition fileds in Dynamics 365
How to change the labels of composition fileds in Dynamics 365
Below JS could be your reference.
[TIPS] Fileds Operation Differences between Form Fields and BPF Fields
When a form displays a business process flow control in the header, additional controls gets added for each attribute that is been displayed in that BPF.
These controls hold unique names like: header_process_<attribute name>.
Code compare Tool: Beyond Compare with License Key

Beyond Compare
V 4.2.2
--- BEGIN LICENSE KEY ---
H1bJTd2SauPv5Garuaq0Ig43uqq5NJOEw94wxdZTpU-pFB9GmyPk677gJ
vC1Ro6sbAvKR4pVwtxdCfuoZDb6hJ5bVQKqlfihJfSYZt-xVrVU27+0Ja
hFbqTmYskatMTgPyjvv99CF2Te8ec+Ys2SPxyZAF0YwOCNOWmsyqN5y9t
q2Kw2pjoiDs5gIH-uw5U49JzOB6otS7kThBJE-H9A76u4uUvR8DKb+VcB
rWu5qSJGEnbsXNfJdq5L2D8QgRdV-sXHp2A-7j1X2n4WIISvU1V9koIyS
NisHFBTcWJS0sC5BTFwrtfLEE9lEwz2bxHQpWJiu12ZeKpi+7oUSqebX+
--- END LICENSE KEY -----
The above license key only applies to version 4.2.2.
How to filter Option Set Field options based on form
How to filter Option Set Field options based on form
In some scenarios, we may need to filter the option set types of fields' options based on some conditions.
Capture user's signature in Dynamics 365 CE
Sometimes we may need to capture user's signature in Dynamics 365.
How to exceed 50 characters maximum label length limitation to set a long label for the Dynamics 365 CE fields.
How to exceed 50 characters maximum label length limitation to set a long label for the Dynamics 365 CE fields.
As we know there is a 50 characters maximum length limitation for the fields(columns) labels of entities(tables) in Dynamics 365 CE.
Sometimes, we may need a longer label than 50 characters. How to do that?
Newly introduced client script methods for D365 CE
https://nebulaaitsolutions.com/newly-introduced-client-script-methods-for-d365-ce/
Newly introduced client script methods for D365 CE
This blog will talk about the new client script methods that can enhance UI/UX experience.
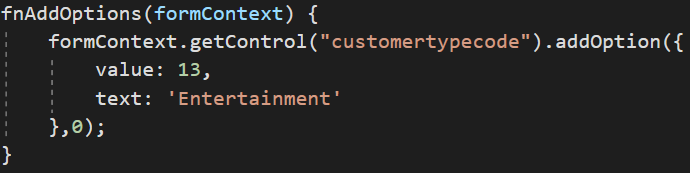
addOption
This method adds an option to your choice/choices control.
formContext.getControl(arg).addOption(option, index);Example
removeOption
Removes an option from a choice/choices control.
formContext.getControl(arg).removeOption(value);Example

clearOptions
Clears all options from a choice/choices control.
formContext.getControl(arg).clearOptions();Example

setFocus
Sets the focus on the control.
formContext.getControl(arg).setFocus();Example

setLabel
Sets the label of the control.
formContext.getControl(arg).setLabel(label);Example

addOnLookupTagClick
Adds an event handler to the OnLookupTagClick event.
OnLookupTagClick:- This event occurs when the user clicks the tag in a lookup control.
formContext.getControl(arg).addOnLookupTagClick(myFunction);createPane
Provides all the information to create side panes.
Xrm.App.sidePanes.createPane(paneOptions);Click here to learn more about paneOptions
Example for addOnLookupTagClick & createPane
Creating HTML Web Resource To Show Image Attached In Notes Using Web API
https://www.c-sharpcorner.com/article/creating-html-web-resource-to-show-image-attached-in-notes-using-web-api/
Subscribe to:
Posts (Atom)